Posts

Showing posts with the label Tips

[TIP] Convert jpeg to PDF

In this article we'll learn how to create a PDF file from a bunch of jpeg images (it can be adapted for other image types as well). Install First we need to install the imagemagick package, so open a terminal window and run: sudo apt-get install imagemagick -y Convert Then change the current directory to where the images are located and use this command to convert to PDF: convert *.jpeg output.pdf Change output.pdf to whatever name you like/need.
[HOW TO] Set display color profile in Xubuntu

In this article we'll learn how to set a color profile in Xubuntu. Install First we need to install xcalib . Open a terminal window and run: sudo apt-get install xcalib -y Load To load an ICM profile, run this command: xcalib profile.icm Reset To revert changes, run this command: xcalib -c Load at startup Simply add an new entry and set the command as " xcalib profile.icm ". If you need help adding a program to Xubuntu's startup see this . References How do you set system display color profiles in Xubuntu and Lubuntu? How to make xcalib always start up automatically?

[TIP] Reload udev rules without restarting

Problem You want to apply a new udev rule without having to restart the system. Solution Open a terminal window and run: sudo udevadm control --reload-rules References How to reload udev rules without reboot?

[TIP] Multi Monitor Full Screen Flash

Image
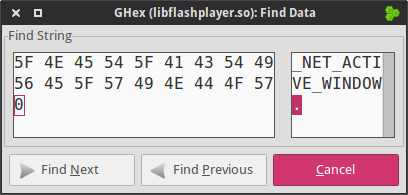
You are extending your desktop on a second monitor and you want to play a full screen flash video, while working on the other monitor. If you use the other monitor the video will exit the full screen. Let's learn how to prevent this. Solution First we need to install GHex and use it to open libflashplayer.so ; open a terminal window and run: sudo apt-get install ghex -y && sudo updatedb && sudo ghex `locate libflashplayer.so` On GHex main window select Edit > Find and type _NET_ACTIVE_WINDOW . Click Find . Close the Find window and replace the N with an A : Save the file ( File > Save ) and restart your browser. NOTE: You will need to repeat this steps if flash gets updated. References UBUNTU MULTI-MONITOR TWEAKS (FULL SCREEN FLASH FIXES, SPAN WALLPAPER ACROSS MONITORS, MORE)

[TIP] DockBarX Xfce Panel Plugin

Image
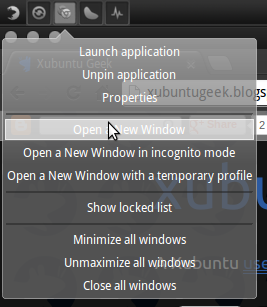
DockBarX is a dock application and is also available as a Xfce Plugin. This allows to have a simple plugin for task management and application launching. The plugin provides other functionality such as progress bars and control Skype, Pidgin, Rhythmbox and Clementine. Install Open a terminal window and run: sudo add-apt-repository ppa:nilarimogard/webupd8 -y && sudo apt-get update && sudo apt-get install --no-install-recommends xfce4-dockbarx-plugin -y Add DockBarX to Xfce's Panel Adding DockBarX plugin to the panel is like adding a launcher (see this ), but you add a DockBarX item instead. Once you add the plugin you can edit its preferences and start pining applications to create launchers! References DockBarX Available as a Xfce Panel Plugin | Web Upd8

[HOW TO] Install Flat Icons Theme for LibreOffice

Image
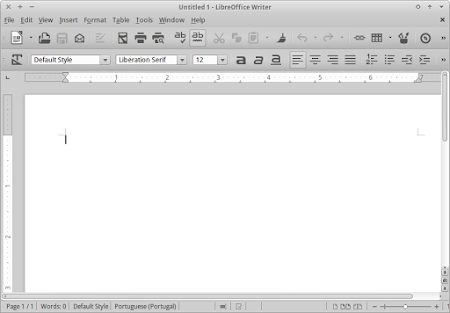
Updated: 07/09/13 In this article we'll learn how to install the flat icons theme for LibreOffice. This theme might become the default theme, but we can start using it now. Flat Icons Theme for LibreOffice Install Flat Icons Open a terminal window and run: cd /usr/share/libreoffice/share/config/ && sudo mv images_human.zip images_human.zip.backup && sudo wget http://blog.goranrakic.com/archives/slike/images_flat.zip -O images_human.zip If the command above outputs something like mv: cannot stat ‘images_human.zip’: No such file or directory , use this command instead: cd /usr/share/libreoffice/share/config/ && sudo mv images.zip images.zip.backup && sudo wget http://blog.goranrakic.com/archives/slike/images.zip -O images.zip References Flat Icons: instale os próximos ícones da interface do Libre-Office

[HOW TO] Get Fingerprint Authentication in Xubuntu

Image
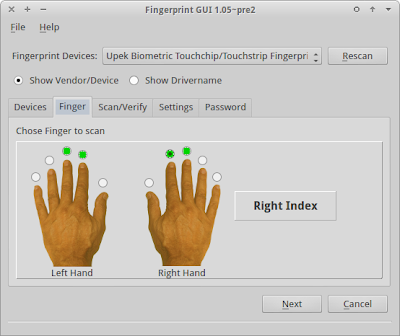
In this article we'll get authentication via fingerprint working in Xubuntu. Install Open a terminal window and run: sudo apt-add-repository ppa:fingerprint/fingerprint-gui -y && sudo apt-get update && sudo apt-get install libbsapi policykit-1-fingerprint-gui fingerprint-gui -y Usage Fingerprint GUI can be accessed typing the following command: fingerprint-gui . On the main interface select the Finger tab, choose a finger to scan and click Next ; this step selects the Scan/Verify tab. Now swipe your finger on your reader. When the scan finishes you'll be asked if you wish to scan another finger. Once you finish the finger scanning, restart the session by logging out. You'll be able to use your fingerprint to log back in. Besides logging in, you'll be able to use your fingerprint in other authentications: sudo, su, gksu . Uninstall Open a terminal window and run: sudo apt-get remove libbsap...

[TIP] Open Xfce4 Terminal drop-down console from Thunar

Image
This article will show how to open a directory in Xfce4 Terminal's drop-down console, directly from Thunar's context menu. You can either create a new custom action or edit the existing "Open Terminal Here" action, adding the following as the command: xfce4-terminal --tab --drop-down --working-directory %f To learn more about adding Thunar's custom actions, read this .

[HOW TO] Disable Wacom tablet without unplugging

This article shows how to disable a Wacom tablet without unplugging it physically. This could also be applied to other input devices, but in my experience I only use it on Wacom tablets. Why am I interested in disabling the device? Well, some programs have problems dealing with multiple devices, and the "tablet inside" a Tablet PC cannot be easily unplugged, making it harder to use a external tablet. Disable the device Open a terminal window and run: xinput set-prop DEVICE_NAME 'Device Enabled' 0 The DEVICE_NAME can be determined using the command xsetwacom list devices . If DEVICE_NAME has spaces you should surround it with quotation marks (either single or double), like so: xinput set-prop 'Wacom ISDv4 E6 Finger touch' 'Device Enabled' 0 The device could be easily enabled again replace zero (0) at the end of the command with a one (1).

[TIPS] Xfce Font Settings

Image
There are two settings related to Xfce font rendering that make fonts look better: Anti-aliasing and LCD Hinting . From my experience with Xubuntu these two settings are set to its optimal value, so I never had any complains about the font appearance. But if you think your fonts could look better, proceed as described below. (click on the images to see the differences) Anti-aliasing disabled and LCD Hinting set to lcdnone Anti-aliasing enabled and LCD Hinting set to lcdnone Anti-aliasing enabled and LCD Hinting set to lcddefault Check current settings Open a terminal window and run: xrdb -query Fix If your Xft.antialias is set to "0" or Xft.lcdfilter is not "ldcdefault", run: # Enable anti-aliasing xfconf-query -c xsettings -p /Xft/Antialias -n -t int -s 1 # Set LCDHinting to lcddefault xfconf-query -c xsettings -p /Xft/Lcdfilter -n -t string -s lcddefault You should logout and in for setti...

[HOW TO] Add options to Thunar's "Send To" menu

Thunar's "send to" menu option can be easily extended using desktop entry files . All we need is to create a new desktop file in ~/.local/share/Thunar/sendto/ for each destination. The desktop file has a MimeType field which allows you to control on which file types the "send to" option will appear. If you omit the MimeType the option will appear for all types. Example The example bellow is a option to send my sketches to Picasa. It appears only for PNG images and uses a shell script that I wrote and is in $PATH . You can use it as a boilerplate for your own. # sketchupload.desktop - Send to Picasa [Desktop Entry] Type=Application Version=1.0 Encoding=UTF-8 TryExec=sketchupload.sh Exec=sketchupload.sh %F Icon=picasa-16 Name=Send to Picasa MimeType=image/png; References The "Send To" Menu

[HOW TO] Remap Xbox 360 controller buttons in Xubuntu

On a previous article I wrote about using the Xbox 360 controller as a mouse. The --mouse option is actually a shortcut for a custom button configuration. You can map any button on the controller to any key/combination. In this article I'll layout the basics. Further information can be obtained in the references. There are two ways of providing a custom mapping: Command line options: use ui-buttonmap to map a button and use ui-axismap to map a axis. The syntax consists of assigning a button name to a symbol. Example: ui-buttonmap x=XK_Tab,a=XK_Control_L+XK_a ui-axismap y2=XK_plus:XK_minus . This will map "X" as "Tab", "A" as "Super+a" and the right stick up is "+" and right stick down is "-". Configuration file: use config to provide the path for a configuration file. The config file has a ini format. Use the sections ui-buttonmap and ui-axismap for configuring the mappings. You can...

[TIP] Open Directory In Guake from Thunar

Image
In this article we'll see how to change the working directory in Guake terminal from Thunar's context menu. Install Add a custom action in Thunar with the following contents: Name: Open Guake Here Command: guake -n NEW_TAB && guake -e "cd %f" && guake -t File Pattern: * Appears if selection contains: Directories Note: This UCA has one problem; if Guake is already visible it'll will hide it. That's because of the --toggle-visibility option.

[HOW TO] Add Thunar Custom Actions

Image
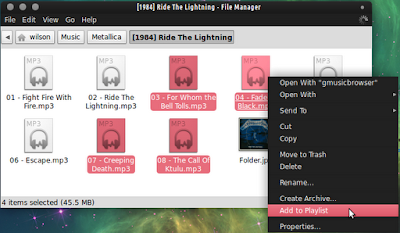
Thunar allows the user to add custom actions the the file and folder context menu (right-click). Add custom action The easiest way is to learn by example: Open Thunar, then Edit > Configure custom actions... . Enter this data: Name: Add to Playlist Command: gmusicbrowser -cmd AddFilesToPlaylist %F File pattern: * Appears if selection contains: Audio files This will show a menu item when audio files are selected that adds them to gmusicbrowser 's playlist. Thunar's custom actions are added to the XML file: ~/.config/Thunar/uca.xml . Check the references for more examples. In the meanwhile I'll post some of my own. References Custom actions

[HOW TO] Remove old kernels in Ubuntu

Image
After running the system for a while the Linux kernel gets updated and the old versions are kept installed, even though that aren't needed any more. In this article I provide a way to remove automatically any kernel version that is older than the current being used. By the way, I was able to recover more than 1GB of free disk space by running this. Remove Open a terminal window and run: current=`uname -r` && uninstall="" && for version in `dpkg -l linux-image* | grep ii | awk '{ print $2}'`; do if [[ "$version" References Remove Old Kernels in Ubuntu 11.10 (Oneiric ocelot)

[HOW TO] Install Awn (Avant Window Navigator) in Xubuntu

Image
Avant Window Navigator (Awn) is a dock-like bar which sits at the bottom of the screen. It has support for launchers, task lists, and third party applets. Awn running on Xubuntu 12.04 Update 25/10/12: Awn is not available in Quantal (12.10). Install Open a terminal window and run the command below. It'll install Awn and all its applets. sudo apt-get install avant-window-navigator awn-applets-all -y Usage Awn can be accessed via Applications Menu > Accessories > Avant Window Navigator or typing the following command: avant-window-navigator . Awn settings (size, position, autohide, applets, ...) can be customized; right-click on Awn and select Dock Settings . Customizing Awn Settings References Awn in Launchpad

[HOW TO] Read documents aloud with Gespeaker

Image
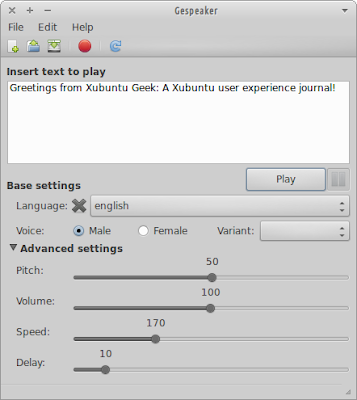
Gespeaker is a GTK+ frontend for eSpeak and Mbrola. It allows to play atext in several languages providing settings for voice, pitch, volume, speed and word gap. There's also the possibility of recording the text played to a WAV file. Gespeaker running on Xubuntu 12.04 Even though Gespeaker latest version (0.8.1-1 at the time of this writing) is dated from June 2010, the version in Ubuntu repositories is still 0.7.3, so in this article we'll install the latest version the project's repository. Install Gespeaker Open a terminal window and run: wget http://goo.gl/kWDhe -O gespeaker.deb | sudo dpkg -i gespeaker.deb | rm gespeaker.deb Install Mbrola Gespeaker can use Mbrola to play text with a more realistic speech. The installation of Mbrola support is accomplished in two steps: First we need to install the mbrola package running this on a terminal window: sudo apt-get install mbrola -y Then the package for a particular language must...

[HOW TO] Customize Xfce Desktop Notifications

Image
Desktop notification are little pop-up windows used to inform the user about an event or display some form of information without getting in the user's way. In Xfce there's a daemon called xfce4-notified which implements the Freedesktop desktop notifications implementation and it's possible to customize its settings. Lets learn how. Xfce Destkop Notification Customize notifications Open a terminal window and run: xfce4-notifyd-config Xfce Notifications Configuration The notifications properties dialog is so simple that it doesn't require much explanation. The theme, the position on screen, the time before disappearing and the opacity can be customized. Notification themes The notification theme can be changed, however, it's not easy to find new themes. They usually come bundled in GTK themes. Some GTK themes provide a xfce4-notifyd theme, just check the presence of the directory xfce-notify-4.0 inside the GTK them...

[HOW TO] Make desktop icons text background transparent in Xubuntu

Image
In this article we'll disable the desktop icons text background, making it fully transparent. The image on the right show the icons with transparent text background Install Open a terminal window and run: wget http://goo.gl/02IGS -O - >> ~/.gtkrc-2.0 This command will create a .gtkrc-2.0 file in your home directory (or append the new content to a existing one), and add the following content it: style "xfdesktop-icon-view" { XfdesktopIconView::label-alpha = 0 fg[NORMAL] = "#ffffff" fg[SELECTED] = "#ffffff" fg[ACTIVE] = "#ffffff" } widget_class "*XfdesktopIconView*" style "xfdesktop-icon-view" If you wish to also change the text color just edit the file replacing ffffff with the desired color's code ( tip: you can use Gcolor2 to help you determine the color code). For changes take effect either log out and log in or run the command: killall xfdesktop , and wait...

Enable Multimedia Keys in VLC and Xubuntu

Image
By default VLC ignores keyboard multimedia keys (Play, Next/Prev, Stop). In this article we'll be fixing that by configuring VLC's global hotkeys. Configure Hotkeys Open a terminal window and run: vlcrc="$HOME/.config/vlc/vlcrc" sed -i 's/#global-key-play-pause=/global-key-play-pause=Media Play Pause/' $vlcrc sed -i 's/#global-key-next=/global-key-next=Media Next Track/' $vlcrc sed -i 's/#global-key-prev=/global-key-prev=Media Prev Track/' $vlcrc sed -i 's/#global-key-stop=/global-key-stop=Media Stop/' $vlcrc VLC must be restarted for settings take effect. Alternative method The same can be accomplished configuring the hotkeys by hand. Open hotkeys preferences: Tools > Preferences > Hotkeys. Then select each action (Play, Next, Prev, Stop) double-clicking the "Global" column and hit the corresponding multimedia key.