Posts

Showing posts from August, 2012

[FIX] X-tile appindicator icons

Image
In Xubuntu, the AppIndicator menu for X-tile doesn't display the icons for the items properly: it displays a icon with the forbidden sign instead. X-tile's menu displaying the wrong icons In this article I provide a solution to this problem and then I explain what I did to fix it. Fix Open a terminal window and run (you'll be prompted for your password and your user must have admin privileges): wget -q -O- http://goo.gl/BEB6r | tar -xz && cd x-tile-icons && ./install-xdg-icons.sh && cd .. && rm -rf x-tile-icons As can be seen in the image below the problem is now fixed. X-tile's menu with the icons fixed Procedure In this section I describe what I did for fixing the problem. It isn't necessary to comprehend this section to use the fix. I just wrote it for future reference. After realizing that I needed to install the icons as resources using xdg-icon-resource , I proceeded with conver

[NEWS] Xubuntu 12.04.1 released

Xubuntu 12.04.1 has been released today along with the rest of the Ubuntu flavors. This means everybody on 10.04 are able to upgrade to 12.04.1 at their convenience. Users on 10.04 should get an upgrade notification when booting their systems up the next time. Users using Xubuntu 12.04 will be upgraded to 12.04.1 automatically along with normal upgrades. References LTS upgrade time!

Undelete bookmarks in Chromium browser

Problem OMG, I deleted a bookmark/folder in Chromium! How can I get it back? Undele Calm down! Take a deep breath, open a terminal window and run: cd ~/.config/chromium/Default && mv Bookmarks Bookmarks.old && mv Bookmarks.bak Bookmarks Please note that this should be done before closing chromium more than twice. Otherwise the bookmarks will be gone forever. Also, in my experience, Chromium should be restarted after running the command for the bookmarks reappear. References Bookmarks undelete | Google Groups

Install Wine 1.5.11 in Xubuntu (PPA)

Wine 1.5.11 has been released with the following major changes: Multi-channel support in the ALSA driver. Removal of the big X11 lock. Support for pair positioning adjustments in Uniscribe. More I/O stream implementations in the C++ runtime. Various bug fixes. A total of 36 were fixed in applications such as "SIM City 4", "S.T.A.L.K.E.R.", "F.E.A.R.3", "Fallout 3", "Prince of Persia: Forgotten Sands", etc, and GeForce GT 630M (with Bumblebee) is now properly recognized. Ubuntu repositories is still 1.4. Bellow instructions are provided to install the latest Wine version from the "Latest official WineHQ releases" PPA. Install Open a terminal window and run this line: sudo apt-add-repository ppa:ubuntu-wine/ppa -y && sudo apt-get update && if [ `uname -m` == "x86_64" ]; then wine="wine1.5-amd64"; else wine="wine1.5"; fi && echo $wine && sudo apt-get

Count number of characters in file from command line and Vim

The command wc prints several file statistics: bytes, lines, words, etc. Using the -m option we can count the number of characters in a text file. Install Open a terminal window and run: wc -m FILE We can count the number of characters from Vim editor using this ex command: :!wc -m % References wc(1) - Linux man page

[HOW TO] Install Shoes (Ruby GUI Toolkit) in Xubuntu

Image
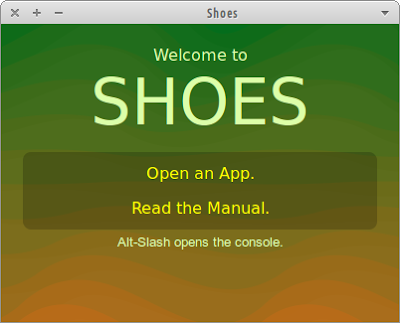
Shoes is a cross-platform toolkit for writing graphical apps easily and artfully using Ruby. Unlike most other GUI toolkits, Shoes is designed to be easy and straightforward without losing power. Figure 1. Shoes (Ruby GUI Toolkit) running on Xubuntu 12.04 Installing Shoes on Xubuntu (or any other Ubuntu distribution) is not as straight forward as it should be. There's a Shoes package in the Ubuntu repositories, however, it's buggy and using it will result in the following error: no such file to load -- rubygems From my experience building Shoes might result in errors during the process. The easiest and simplest way to install Shoes in Xubuntu were to download Shoes 2 (0.r1134), codenamed “Raisins” and use it to run the Shoes programs. It's a older version, but I'm just getting started with Shoes and for now it'll suffice. Install Open a terminal window and run: sudo wget -O /usr/local/bin/shoes http://goo.gl/3cigS &&

Assign Ctrl+Alt+Del to Xfce's Task Manager in Xubuntu

Image
UPDATED: 18/08/12. By default the Ctrl+Alt+Del run xflock4 which locks the desktop. In this article we'll change this keyboard shortcut so that it'll run Xfce's Task Manager instead. Also the Ctrl+Alt+L shortcut will be assigned for running xflock4 . Xfce's Task Manager Install Open a terminal window and run these two commands: # Assign Ctrl+Alt+Del to Task Manager xfconf-query -c xfce4-keyboard-shortcuts -n -p "/commands/custom/<Primary><Alt>Delete" -t string -s "xfce4-taskmanager" # Assign Ctrl+Alt+L to xflock4 xfconf-query -c xfce4-keyboard-shortcuts -n -p "/commands/custom/<Primary>&ltAlt>l" -t string -s "xflock4"

[HOW TO] Install nautilus-gksu (extension for opening files as administrator) in Xubuntu

Image
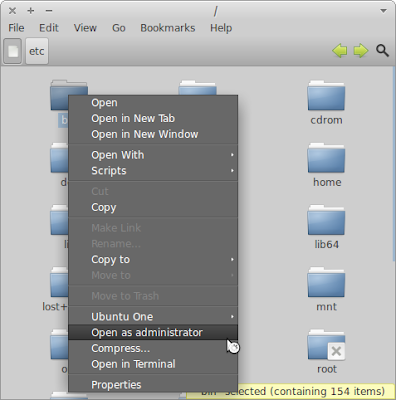
nautilus-gksu is a extension for the Nautilus file manager. It allows to open a file/directory with root/administrator privileges. nautilus-gksu running on Xubuntu 12.04 Install First we need to install the nautilus-gksu package. This package is available on Ubuntu < 12.04 repositories. For Ubuntu 12.04 we'll be using Linux Mint repositories. After installing the extension we set Nautilus as the default file manager (not doing so will result in opening folders as administrator in Thunar). The following line will determine which Ubuntu version you're running and proceed accordingly; just copy and paste on a terminal window: if [[ $(lsb_release -sr) == "12.04" ]]; then echo 'deb http://packages.linuxmint.com/ maya main upstream import' | sudo tee /etc/apt/sources.list.d/linuxmint.list && key=3EE67F3D0FF405B2 && gpg --keyserver subkeys.pgp.net --recv-keys $key && gpg --armor --export $key | sudo apt-key add

[HOW TO] Find the process ID (PID) of a running program

The command pidof allows to find the process ID (PID) of a running program. All that's necessary is to supply the program name/command. Example Here we're trying to determine the PID for the Chromium browser. Two processes were found: $ pidof chromium-browser 4639 4637 References pidof(8) - Linux manpage

[HOW TO] Install Ruby in Xubuntu

Ruby is an interpreted, dynamic, open source scripting language for easy object-oriented programming. It a focus on simplicity and productivity. It has an elegant syntax that is natural to read and easy to write. In this article will learn how to install the Ruby interpreter and RubyGems in Xubuntu. Then we'll take a quick look at how to run a Ruby program and how to install a gem package. Install Open a terminal window and run: sudo apt-get install ruby rubygems -y Run a Ruby script ruby script.rb Run the interactive interpreter The irb is a tool to execute interactively ruby expressions read from stdin. Run the command irb and type the Ruby command. Examples: $ irb irb(main):001:0> 2**20 => 1048576 irb(main):002:0> name = gets XubuntuGeek => "XubuntuGeek\n" irb(main):003:0> name.chop! => "XubuntuGeek" irb(main):004:0> puts "Hello #{name}" + "!" * 3 Hello XubuntuGeek!!! => nil List remote instal

[HOW TO] Deepin Software Center in Xubuntu

Image
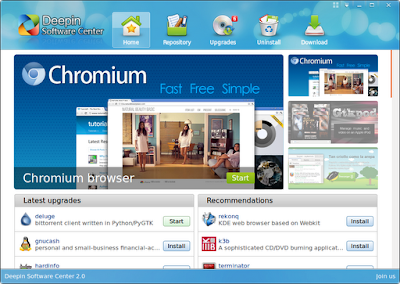
Deepin Software Center (DSC) is the Software Center of the Deepin Linux distribution. It allows Installing new applications in just one click, supports parallel downloading, resuming downloads, update notification and cache cleaning. DSC also comes with colorful skins that can be swapped as your mood changes. Deepin Software Center running on Xubuntu 12.04 Here's a overview video by omgubuntu : Install Open a terminal window and run this line: wget http://goo.gl/EPKv6 -O deepin.deb && sudo apt-get install libc-ares2 aria2 && sudo dpkg -i deepin.deb && rm deeping.deb Usage DSC can be accessed via Applications Menu > System > Deepin Software Center or typing the following command: deepin-software-center . References [How To] Easily Install The Slickest Software Center on Linux Features and Screenshots of Linux Deepin

[HOW TO] Hide partitions on Xubuntu

Image
In this post we'll learn how to hide some partitions on Xubuntu. It should work for other Linux distributions and works for any file manager. Determine Partition Names Before proceeding you must determine the names of the partitions you want to hide (eg. sda5, sdb1). Open a terminal window and run: sudo parted -l This command will output the partition information for each disk (eg. /dev/sda). Pay attention to the partition size and file system type and you should be able to determine the partition number (which is the first column). Just add the partition number to the device name (ignoring the /dev/ part) and you have the partition name. Hide Partitions Now we create the /etc/udev/rules.d/99-hide-disks.rules file and write a line like this KERNEL=="PARTITION_NAME", ENV{UDISKS_PRESENTATION_HIDE}="1" , for each partition. Don't forget to change PARTITION_NAME . Update: 12.10 users must use UDISKS_IGNORE instead of UDISKS_PRES

[HOW TO] Backup with Déjà Dup in Xubuntu

Image
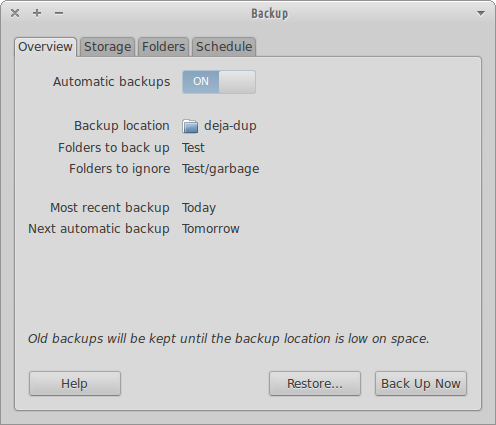
Déjà Dup is a simple backup tool. It hides the complexity of backing up the Right Way (encrypted, off-site, and regular) and uses duplicity as the backend. Install Open a terminal window and run: sudo apt-get install deja-dup -y Usage Déjà Dup can be accessed via Applications Menu > System > Backup or typing the following command: deja-dup-preferences . On the Overview tab a summary of your backup settings is displayed and have options to enable automatic backups, restore a backup or perform a backup. On the Storage tab you can choose a location for your backups. It can be a remote location. On the Folders tab you can choose what folders to backup and what folders to ignore. On the Schedule tab you can choose the backup frequency (Daily, Weekly, Every 2 Week, Monthly) and the old backups removal policy (keep backups at least a month, two months, three month, six months, a year or forever). Backup